Pages

Friday, December 27, 2013

:: project life organization for 2014 ::

I'm back with a look at how I'm organizing for Project Life  2014. Have you heard of Traci Reed? She is pretty awesome!  I found an totally rad calendar/planner that she designed to help her organize for project life (for more information, click the photo to the right and keep reading)! I downloaded her work and quickly set out to make a planner that works for me.  It took a little editing in photoshop (since my weeks are going Wed-Tues.), but it wasn't too long before I was off and running!
I decided to make three planners this year, but I started with just one -- just in case this doesn't end up working for me!  I made this very similar to how I have made some journals in the past; chip board, card stock/patterned paper, and the cinch, that magical cinch.  Best recent tool purchase. Below are a few photos of my planner (with a bit of supportive text)!

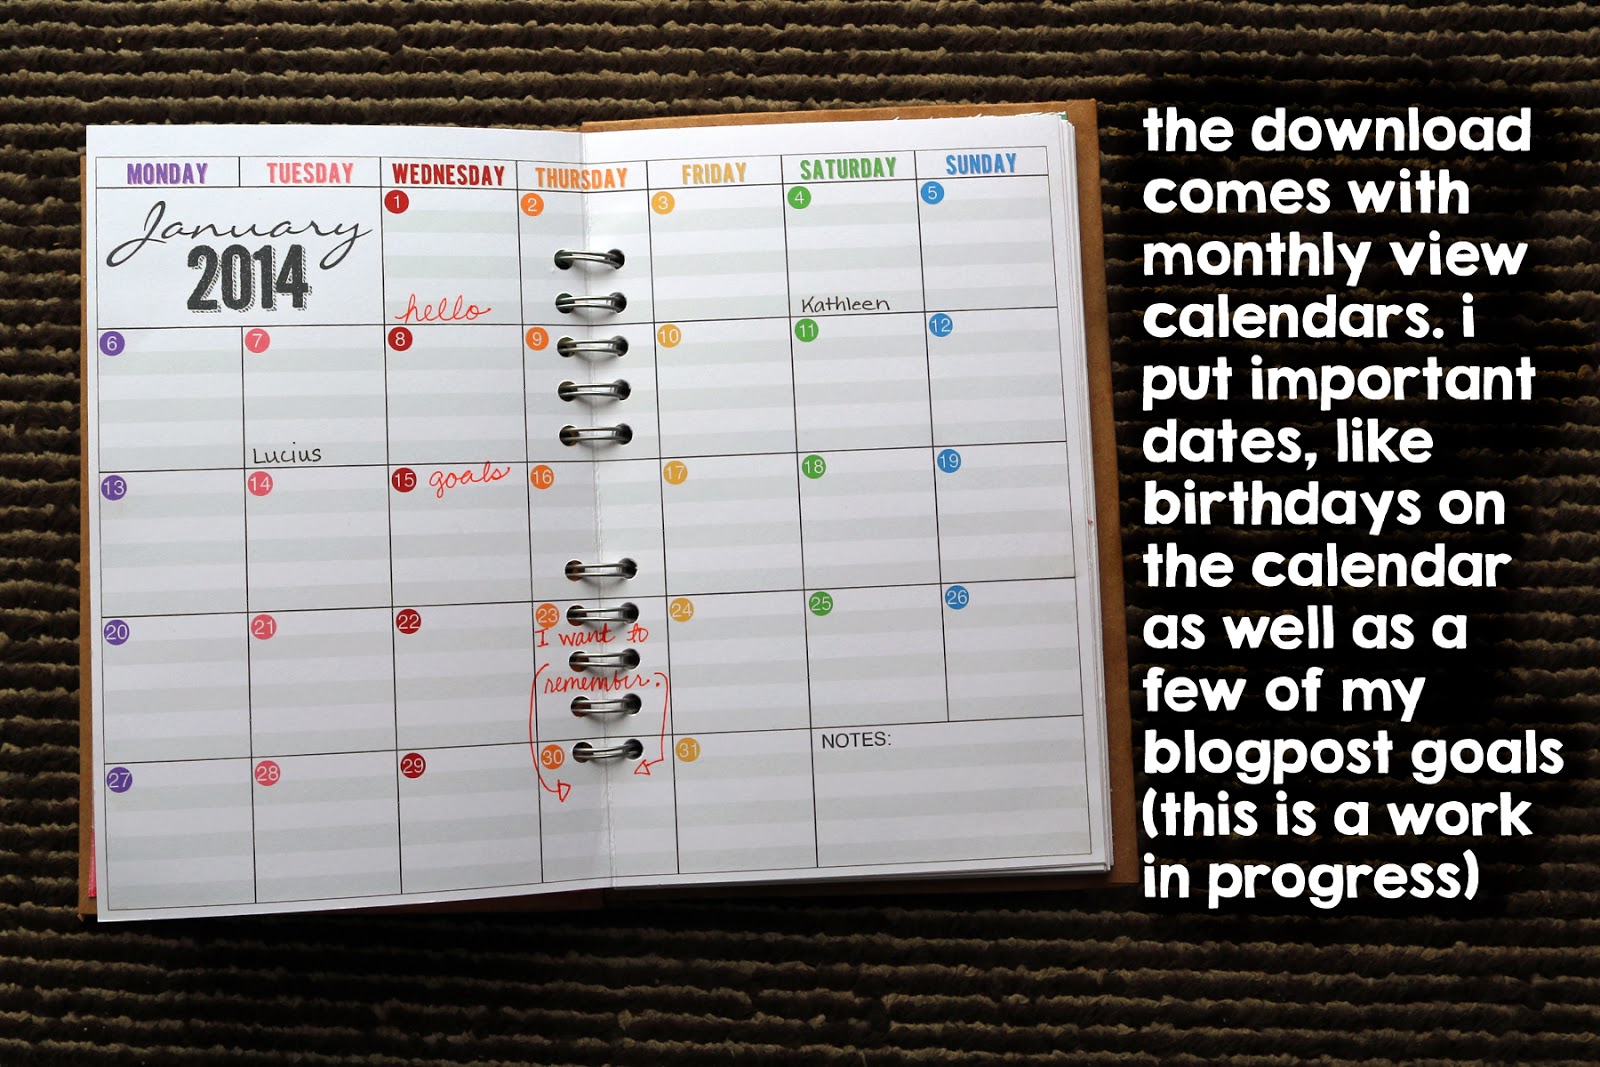
I chose to have my weeks go from Wednesday to Tuesday this year (since the first is on Wednesday). My thinking is that I will have several days to complete the week (and photograph my LOs) before my goal of posting on Sunday. Yep, I set a goal to post all my PL layouts this year. I'm hoping this will give myself some accountability to complete!  We'll see how that works (I hope it works better than New Year resolutions that involve tread mills).  

I hope this journal and goal setting thing works for me.  As I mentioned in my last post, I am totally OK with missing weeks throughout 2013. But wouldn't it be magic if I could complete 2014? I think so. I will continue to use the momento app that I talked about in this post to help me out! It is a must have!

I'll be back soon with a post that includes my title page for PL 2014 (and maybe another DD update)! Hope you all had a Magical & Merry Christmas!


UPDATE 5.12.14 -- I've now used this notebook for four months -- check out this update

Tuesday, December 24, 2013

:: project life reflection and moving forward ::

Wow!  I have so much to say about Project Life, but I'll try to be succinct:

I LOVE this PROJECT.

That pretty much says it all.  Here are a couple of recent weekly spreads (from Thanksgiving week and the first week of December).


For both of these I mostly used Studio Calico Project Life Kits (Nov. & Dec.).  Of course, I added a few things from my stash. I am loving the SC PL kits, and I will continue my subscription in 2014!

So how did I do in 2013? 

OK. I missed several weeks. I learned a lot about myself along the way, and I documented more than I have ever done before. So overall, even with the missed weeks, I am happy I tackled the project, and there is no way I can see my life without it.

Will I go back and finish 2013? 

Maybe. Like I said, I documented more in 2013 than I've ever documented, and I am totally happy with that. I want to move forward into 2014 with a clean slate (that's part of what the new year is about, right?), and not worry about 2013. However, if I find myself with extra time on my hands, or I'm motivated to go back, I will.  My focus is going to be moving forward, though.


What will I do the same in 2014? 

I am going to continue to work with the Studio Calico Project Life Kits. They are awesome. I started the year last year with a core kit -- Seafoam -- which I also love.  It is quite likely that there will be cards from that kit included in 2014. I will also continue with the 12x12, weekly, two page spread (with inserts when needed & as time allows). I used several different page protectors in 2013, but I mostly used the BH "A" style, and will likely continue using those. I will also stick with the orange WRMK 12x12 binders (they have already arrived on my doorstep)!

What will I change for 2014? 

I will likely not buy another core kit. It's not that I don't like them, it's more that I like the Studio Calico kits better, and I probably only like them better because I get bored with just one core kit. With the SC PL kits I feel like I can still have cohesion, at least over a week, maybe even over a month, but I also have a lot of variety. I do like the BH mini kits. I have a couple, and I imagine I will incorporate them into my PL next year (and I might buy more).  :-)  The only other thing that is quite tempting to me is the HSN exclusive "Just Add Color" kit!  I am loving the little 2x2 squares in that kit. I have resisted purchasing that kit (so far)!

Over the next couple of days I hope to share how I've started organizing for next year's PL, and how/when I plan to share my work on this blog next year. Here's a little sneaky sneak of my title page in progress:

Thanks for reading!

Monday, December 23, 2013

:: december documentation update one ::


Well, we are nearly to the big day, and I have felt excited, overwhelmed, discouraged, hopeful, and excited again with my December Daily 2013 project (only sometimes in that order, sometimes all within an hour)! This process is always good for me. I don't mind the roller coaster if it gets things documented!

A few weeks ago, I shared my cover and a few of my inside creations in this post. Today's post is meant to share a bit of behind the scenes stuff, as well as photos of the pages. Here we go!


Bea wrote a letter to Santa because she had a question about the elf (was it real?). I scanned the letter, and sized it down for the front of the envelope.  Also, there are more photos and story than I had space for, so I added a flip pocket (see below).


I put the original, full sized letter inside the envelope, of course.  When Snowflake (our first year with this elf, by the way) leaves Bea a note, it's always either 4x6 or 3x4 -- magic!  That elf is so smart and helpful (and a little creepy, but we are trying to overlook that). I plan to make a list of all (or most of) the places Snowflake surprised us and put it on that journal card.
This spread is a couple of "days" (really magical moments, see how I'm tackling this project below) in one. The tradition of a book a day continues this year (our third year). Under the sorting photo, there is another photo, and the story. The other side of the spread is about our wrapping paper this year.  :-)


There are a few more photos on flickr, here.

products i am using | I am mostly using the December Daily kit from Studio Calico and Ali Edwards. I did buy a few things, and I have a few other things in my stash that I am using, but mostly, it's from the kit.  The important stuff not in the kit: silver thread for my sewing machine (helps with the magic), wood veneers from target (in the Christmas wrapping paper section), and some blank transparencies, vellum, and wood veneers from my stash!

how i am tackling this project in 2013 | Instead of completely "following the rules", I am not approaching this project as documenting something every day. There really are no rules. It really is all about what you want to document; what memories you want to keep safe.  Each year I let the implied rule (December DAILY) get in the way of me completing the project. So this year I am mixing it up. This year I am documenting 25 (or so) magical moments of the season.  It is likely that I won't add much 'everyday' stuff into this DD, because I have Project Life for that.

other things keeping me busy | I am participating in several classes in December (both free and paid). Your December Inspired, Insta-Christmas, Picture Your Holidays, 30 Days of Lists, December Duos, and Holiday Storyteller. Each of these classes provide prompts and inspiration to help me deepen the level of storytelling I am putting into this project. I am so loving my daily emails!  I hope to share some of the projects (that aren't included in my DD) here soon. Until then I hope you are having a magical and peaceful holiday season!

Coming soon: reflection on Project Life 2013, and looking ahead to 2014!

Sunday, December 1, 2013

:: hello december ::


hello christmas season.
hello magic and wonder.

hello december documentation.

hello hustle.
hello bustle.
hello family and friends.

here. we. go.

Saturday, November 30, 2013

:: december documentation ::

I am going to attempt another "December Daily" this year. I ordered this kit from Studio Calico and I've been working on it, bit by bit, over the last couple of weeks. I cannot bring myself to make "foundation pages" like so many do!!  I did, however, work on the cover, title page and a few cards for inside. Some things I completely copied from Ali Edwards, but other stuff I created from scratch.  I've even made a few brushes, cuts, and cards to add to the kit! I'm loving the "see through" trend, so I imagine you will see a bunch of vellum and transparencies whenever possible.  And lets not forget glitter and sequins (both of which are all over my house right now)!!!

Let's start with the cover...

First I painted the cover, back cover, and the inside with silver paint.  Then I went back over the front and back covers with just a little bit of silver glitter paint.  I glittered the wood veneer letters from the kit, and I think the smaller snowflakes are also from that set.  I found some awesome wood veneer shapes at Target and used three of the snowflakes for my cover (after covering with glitter, of course).  The silver ribbon is also from the kit!

Here are a few inside things I've made:
Made "bring on the twinkle" in photoshop, printed on vellum, sequins mostly from the kit.
This is a total Ali Edwards rip off!
Flair from the kit and I made the "card" in photoshop, printed on vellum.
Used stamps from the kit, StazOn ink, and a transparency that I cut to size for this one.
More sequins, more stamping, more StazOn, more vellum!
This is one of my faves! Letters from dollar spot at Target, sequins from my stash and the kit, sewed the lines with silver thread.  I will post closeups when I post about this day.
Used the digital file from the kit to make "magic" then used letters from the kit for "lives here". Stapled with the tiny attacher to a Hambly transparency that I had left over from previous years!


Friday, November 1, 2013

:: hello november ::


hello friday.
hello pizza & wine.

hello thirty days of thankful.

hello holiday decorating.
hello holiday shopping.
hello de-stashing.
hello creating.

Sunday, October 27, 2013

:: handmade journal ::

So.... a couple of weeks ago I participated in TWO days of classes, with many awesome instructors, all online.  Throughout True Scrap 5, and since then, I have been inspired to try a zillion new things, but cursed with little time to implement. However, I do have some fun to share today! One of the classes was taught by Heidi Swapp.  She made an awesome journal with scrapbook papers, a composition notebook, and her Cinch machine.  I loved it, so I tried it (did I mention that I bought a Cinch right after True Scrap 5?)!
Cover
I haven't decided how I'm going to "close" this.  I may do what Heidi did and add an embellishment on the front that the flap can go behind. Or I might just use some ribbon.  I'll have to think on that for a bit before I commit.  ;-)

I used a paper pad by Amy Tangerine for just about everything (the cover, inside pages, etc.).  I think that made it a bit easier because everything works together quite nicely!  The only other thing I added was a journal that I got from Michael's a while back. I knew I'd use it someday (I think it was just a buck)!  I'm not going to bother you with every page, but here are a few!
Cover Open
I made a couple of "pockets" and made tags to go inside the pockets.
Notice that paper on the left...it comes up later!
The front of the journal I purchased at Michael's

....and the inside of that journal
You guessed it, the back of the journal!

I added a few pocket protectors throughout the book


I used gelatos on the right page to create an ombre effect (it started B&W, see above)!
I haven't quite decided what I'm going to do with it.  It will likely be a journal of some sort, with photos...so maybe a mini book?  I dunno.  I'm sure I'll add a few little details as I work with it. Thanks for stopping by!

Thursday, October 24, 2013

:: i want to remember ::

I want to remember that you insisted on wearing your finger lights to bed tonight.
I want to remember that you made Daddy turn off the lights so you could shine them on the ceiling.

I want to remember how excited you were yesterday to show us the pumpkin you got on your field trip, but that it was more exciting for you that you got to ride the bus.

Twice.

I want to remember that one of your famous sayings recently is "I'm not afraid. I'm not afraid.  I'm not afraid of anything." Especially when you are going to be in the dark.

I want to remember that you say those words like you are going on a lion hunt.


Sunday, October 20, 2013

:: pumpkin picker ::

I was going for luscious fall layers to highlight the photos from B.'s pumpkin picking adventure in our front yard. The journaling is hidden in the tabbed pocket on the right.
Have I mentioned how much I love my Scrapbook Circle Kits?  Each month I so look forward to the arrival of that lovely pizza box full of goodies. Sometimes I devour it immediately, sometimes life requires me to wait, but I'm always inspired by the papers, embellishments and the ladies on the blog that provide such inspiration. Most of the items from this LO came from the June kit or the add-on kit that month. Many of the items were from the Basic Grey Hipster collection.

This LO was also inspired by this October sketch by Diana Fisher (also at Scrapbook Circle). You have until October 23rd to play!
I went a little crazy with the stitching on this one!  :-)  But, I liked it so much, I couldn't put the journaling over it!

Thanks for visiting!

Thursday, October 17, 2013

:: super friends ::


In yesterday's post I promised another LO from the same October Scrapbook Circle kit -- but with a very different look.
 Did I deliver or what? ;-)  Check out all that color!  Nothing subdued about this one!

Did you notice the cool technique I used on the photos?  I recently attended True Scrap 5, produced by Lain Ehman. As in the past, this was so much fun!  It is two days of online classes, by many instructors (like 15, I think).  There is chatting and cropping and learning and inspiration....I could go on and on.  It left me so inspired to create! One of the techniques that I just had to try was ink on the photo to create a "Warhol" effect.  I printed the same photo four times, once in color, the others in b & w.  Next I used stamp pads directly on the b & w photos (just swipe the ink across -- several passes) to color them. Easy peasy, fun, and I like the look.  Funny that I used ink on the photos, but for the stamping in the background, I used gelatos (hadn't tried stamping with them yet and decided to go for it.  Worked like a charm)!

What technique have you been dying to try but haven't?  What's holding you back?!